Generative AI is becoming immensely popular & its power to create realistic images is just magical. The following article mainly discusses custom stable diffusion models, one great example of generative AI. The subsequent paragraphs discuss how to train custom stable diffusion models for realistic face cloning. If you’re interested in learning about the complete process, then stick to the end of a blog post!
Numerous pre-trained models, such as Realistic Vision and Cyber Realistic, have been developed to generate photorealistic images based on various parameters. However, accurately replicating a person’s face remains challenging for these models. Consequently, training a custom Stable Diffusion model is necessary to envision yourself in specific locations, attire, poses, and styles with exceptional realism. These models can generate highly realistic images by providing prompts and adjusting parameters.
Custom Stable Diffusion models have diverse applications, including creating social media posts for LinkedIn, Instagram, Facebook, and Snapchat. They enable individuals to present themselves in the best possible light, capturing pictures with optimal lighting conditions. Users can experiment with different outfits, transform their appearance, and showcase themselves in various settings, enhancing their online presence and engaging with their audience.
Custom Stable Diffusion Models: Various Methods for Training
When it comes to training a model capable of generating photos, there are several approaches available. To achieve exceptional realism and accurate face cloning, we have experimented with three techniques that have yielded promising results. These methods include:
- Training LoRA directly through Kohya Dreambooth: This approach involves training the LoRA model directly, offering several advantages. Training LoRA requires less time and computational power than a base model or checkpoint. The storage space occupied by a Dreambooth-trained model typically ranges from 2 to 5GB, while LoRA is much smaller, around 100 to 150MB.
To undertake this training, it is recommended to have at least 20GB of VRAM. If your local system cannot handle the training load, utilizing cloud solutions like Google Colab with GPUs, such as A100 with High RAM enabled, is advisable.
- Training a full-fledged Dreambooth Checkpoint: Another approach we have explored involves training a comprehensive Dreambooth Checkpoint. While this method can be resource-intensive and time-consuming, it has shown promise in generating high-quality images.
- Extracting LoRA from Dreambooth Checkpoint: The third technique we have employed is extracting LoRA from a Dreambooth Checkpoint. This approach allows us to benefit from the Dreambooth training while leveraging the compact size and efficiency of the LoRA model.
Applying appropriate prompts and parameters, especially negative ones, is crucial when using these methods. At the end of this article, you will find a collection of extensive negative prompts that have yielded favorable outcomes. In subsequent articles, we will provide individual overviews of each method and share the experiences of our Stable Diffusion experts. In this first article of the series, our focus is on LoRA Model training
Direct Training of Custom LoRA Model
Starting with our model training team’s preferred approach, direct training a custom LoRA Model offers several advantages. This method requires less time and computational resources than training a base model or checkpoint. A typical Dreambooth-trained model occupies around 2 to 5GB of storage space, while LoRA is much smaller, ranging from 100 to 150MB.
To facilitate this training, it is recommended to have at least 20GB of VRAM. If your local system cannot handle the training process, we suggest exploring cloud solutions like Google Colab, which provide access to GPUs (such as A100 with High RAM enabled) and can alleviate the computational burden.
To use Kohya SS, we have provided a Google Colab notebook: Link to the Google Colab notebook for Kohya SS
Before proceeding with the training, our Stable Diffusion Model training team recommends ensuring that you have the following pre-requisites:
- VAE (Variable Autoencoder) used for training and image generation:
- vae-ft-mse-840000-ema-pruned.ckpt (Link to the checkpoint)
- Base Models:
- For training: Cyber Realistic V3.0 fp32 (Link to the model)
- For image generation: Next Photo V1.0 (Link to the model) – Our Favorite
- Additional options for image generation: Cyber Realistic V3.0 (Link to the model), Realistic Vision V2 or V2.1 (Link to the model)
- Embedding models used for image generation (particularly helpful for negative prompts):
- veryBadImageNegative (Link to the model)
- EasyNegative (Link to the model)
- Regularization Images
- Use 50 to 60 times more photos than your training image set. These images can be generated using any model from Stable Diffusion. Adjust the batch size and number of batches to generate approximately 800 pictures as per your requirements. Alternatively, you can download the images from the following repository, ensuring you select the appropriate type (man, boy, girl, woman, person): Link to the repository for regularization images
Now that you have all the necessary components installed, we will set parameters and provide a step-by-step guide to utilizing the essential options in Kohya SS.
Image Selection and Preprocessing
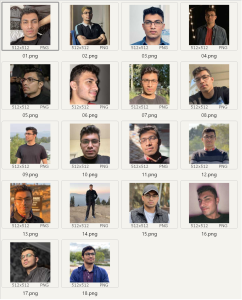
Let’s begin by describing what I did with the dataset. We selected 18 images and cropped them. For a photorealistic model, it’s essential to have at least 60% close-up images, around 25% medium shots, and 15% full-body shots. It can be reduced to 16 images by removing 06.png and 10. png.
In reality, 1-2 photographs can substantially negatively impact the model’s quality, especially if there are any issues with the eyes in those images.
After preprocessing it to 512 X 512 image resolution, here’s what the dataset looks like.